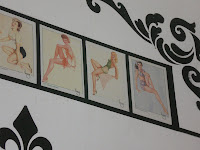
The stenciling is a different story lol.


Whats the secret to this? Laser photo copies. Yep It's as simple as that. You can go to any office supply store and create your own motifs on the $.50 color laser copiers.
Items you will need:
Photo copies of your choice
scissors or xacto knife
damp sponge
wallpaper paste...it is best to spend the extra $ for kitchen/bathroom wallpaper paste if your doing a bathroom or kitchen. You do not want all your hard work peeling off the wall from the humidity.
Liquitex matte varnish
1"-2" paint brush ..this really depends on the size of the designs
I painted borders on the wall around where I was going to apply my cut outs. I thought It would be a nice touch. I do not recommend applying them over dark paints, it can show through the paper.
1. Plan your designs and cut out your motifs
2. Wash your walls with a degreaser like TSP, to achieve good adhesion. You wouldn't want all your hard work to start peeling on you.
3. With your paintbrush, apply wallpaper paste to the back of the motif and to the wall where you plan to apply it. Apply your motif to the wall and using the damp sponge smooth it into place and work out any air bubbles. You can fiddle with them a bit, but don't rub too hard they may tear. Wipe off any excess paste as you go. The paste dries clear, but you don't want any large blobs. Continue around the room till you have them all applied.
4. Let them dry for a few hours. The time needed depends on your area and humidity level.
5. Apply the Liquitex matte varnish over just the motif. Its a great protective coat, and I find a necessary step. Some have used the varnish to apply their motifs. Which will work. But if you ever plan to redecorate you will have a heck of a time removing them.
6. Enjoy all your hard work.


